Articles in Tags handmade DIY

1. Maza weaving method tutorial

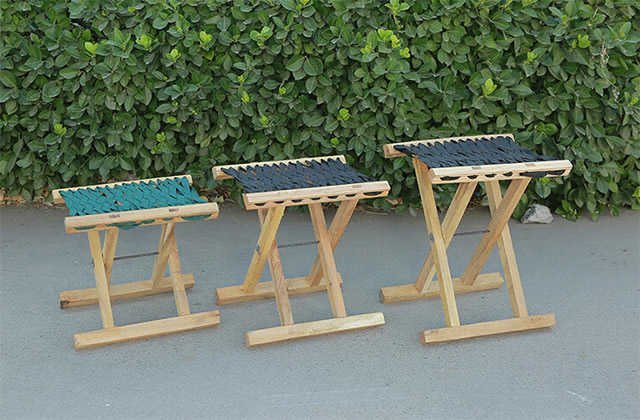
Maza is one of the common small furniture in life. Although its appearance is not good, it is practical and portable. The temporary break for Outdoor is very useful. If you know weaving, you can also weave a Maza with a flat line. The specific method steps are as follows:

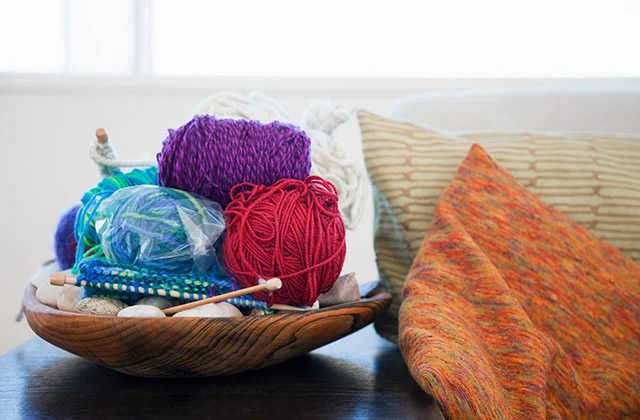
1. Preparation materials: Maza wooden frame, white cotton rope, color cotton wire, weaving needle, scissors.

2. Take a section of cotton rope as the Maza meridian, use a knitted needle through the holes on the side of Maza to wrap, and tighten the meridians, and leave a 10cm meridian at both ends to fix the knot.

3. Take a colored cotton line for latitude, and shuttle up and down through the line.

4. Repeat the above steps to shuttle up and down with a knitted needle at the end of the fabric.

5. The thread left left by the weft line is fixed with the meridians, and a woven Maza is completed.

2. What are the Maza ropes?

When weaving Maza, there are many types of Maza noodles, so there are many ways to wear Maza's rope. The holes on the Maza with a thin band Panza are generally single, including 9 holes, 13 holes, 15 holes, etc., Let s introduce the specific rope wearing method:

1.15 Confelza piercing rope (with a line of about 9 meters)

(1) Fold the lines. The header is marked with A and B.

(2) Pass B from the outside of 1, and pull the middle point of the line to one place.A penetrates from 2.

(3) A in one, and then put in two 1 3 one 3 1 4 one 5 6 4 7 5 9 10 10 10 10 10 10 10 10 10 10 10 10 10 10 10 10 10 10 10Seven Eight 11 12 Nine 10 13 14 11 12 15.

(4) Putting B into the four, pay attention to the weaving of the grid, and put it in five 2 3 6 7 5 8 9 7 10 8 9 tenTwo Thirteen 10 11 Fourteen fifteen 12 13 fifteen 13 15 14 fifteen 14 15, you can complete.

2. 9 Confucius Piercing Rope

Panza divides the two rows of Maza's pores into upper nine holes (-) and lower nine holes (-).

(1) Upper 1, 2, 1.

(2) Upper 3 up 1, 3, 3, 3, 3, 5, 6 or 6 times, 7 below, 7 below, 8 below; upper 6, 7 below and 8 below 8.

(3) Upper 9, 8 below, 9 below 7; up to 9 below 6 below 5; up to 6 below 4 or 4 times; up to 5, 4 below and 2 below 1.

(4) Upper 2.

3. 13 Confucius Piercing rope

Upper 1 is the line:

(1) Upper 1 in 4; 4 in the lower 4 in 5; 1 down 5 in the upper; 1 in 1 in the top of 1; up to 6 in the top of 1; lower 6 to 7.

(2) Upper 7 to 2; up to 3 in the upper and up to 3; up to 8 in the lower 8; lower 9 in the lower 9; upper 4 to 5.

(3) Upper 5 to 10; 10 in the lower 10; the lower 11 in the upper 6; the upper 6 in the upper 7; the upper 7 to the upper 12;

(4) Insert 13 into 8; 8 in 8; Upper 9 to 13; lower 13 to enter 13; lower 13 to 10; upper 10 to 11.

(5) Upper 11 to 12; 12 in the lower 12; the lower 11 in the upper 12; the upper 12 in the upper 13; the upper 13 in the upper 10; the lower 10 to the lower 9.

(6) Upper 9 in upper 13; up to 13 in the upper 13; upper 13 in the upper 8; lower 8 to 7; lower 7 to 12; upper 12 to 11.

(7) Upper 11 in 6; 6 in the lower 6 to 5; down 5 in the lower 10; up to 9 in the upper 9; upper 9 to 4; lower 4 to 3; lower 3 to 8.

(8) Upper 8 to 7; 7 in upper and 7; 2 in the bottom 1; down 1 in the lower 6; up to 6 in the upper 5; up to 1 in the upper 1; 1 down 1 to 1.

(9) Upper 1 in the upper 4; up to 4 in the upper 3; up to 3 in the upper and lower; the lower 2 in the bottom 3; the lower 3 in the upper 2; the convergence of the line.

1. Weaving method of hair band

tools/raw materials:wool and wool needle.

Method/Step:

1. Prepare the woolen and woolen needles, a short needle, or toothpick, and start 28 stitches.

2. Start with a row of needles and knit your head.Then turn it over, the first needle is not woven, and the second needle starts with 7 pins, 12 stitches, and then weave 8 stitches.In other words, the two heads of 8 stitches are knitted in the back of the opposite side, 12 needles in the middle, and the lower needle is woven on the front.But pay attention to the first row of the first row to pick it out.

3. Repeat the length of the weaving of the above weaving to the left and right sides. The length of the number of broken waves will begin to change.After weaving 8 stitches, pick 6 stitches with a short needle or toothpick, weave the 6 pins behind, and then weave 6 stitches on the toothpick.

4. Then continue to weave in accordance with the weaving method of the second step. When weaving to the length of 10 waves, start with 8 stitches and picked 6 stitches with a toothpick.6 stitches, and then weave 8 stitches on the side, so that a trick is woven.

5. According to the length of the weaving of 10 waves, the weaving method is changed.Then collect the needle.

6. Then stitch the opposite head and tail.

7. Then turn it over to try, the good -looking and practical hairband is completed.

Note:

1. 8 stitches on the left and right sides, the front and back are knitted, the middle 12 needle is knitted on the front, and the upper needle is woven from the reverse side.

2. The first needle of each row is picked over.

two,How to weave wool hair band

tools/raw materials:wool,hook needles.

Method/Step:

1. First of all, we must weave a needle -like needle method, so their length is 6 Wheat ears.Immediately, the hook needle we got quickly passed through the first circle in the Wheat ears.

2. Then we have to walk around the hook needle, and then we have to tighten the line, then our hook needle must remember to remember the hook needle from the right side of the right side of the hook needle.Okay, then make the ears of the Wheat ears a ring.

3. Let's sew a small dot Wheat ears below. Three all are good. Everyone remembers that we must quickly tighten on our hook needle.Then we must pass the hook needle from the large ears of the Wheat ears and pass through the large ring.Below it should be around the hook needle in our hands, tighten quickly, and head down.After finishing it, we put the hook needle together, that is, remembering the three circles on the hook needle. Remember to pass through.

4. In the end, we should take a circle on the hook needle in our hands. At this time, we must quickly tighten, and the sharp head must remember to facing down.These are our hook heads from the three laps from the hook needles on our hands. Everyone pays attention to the two circles on the far left.Remember not to wear the third one!Immediately after our hook head, we found the two circles on the far left from the three circles on the hook needle on our hand.Remember not to wear the third one.This is our hook head to complete the last step from the hook needle, pass through all the circles, and finally suture, we complete it.

Summarize:

1. We have to go around the hook needle, and then we have to tighten the line.

2. Sewing a small p -Wheat ears, all three.

3. Last step, pass through all circles.

Note:Below it should be around the hook needle in our hands, quickly tightened, and head facing down.

1. The practice and size of the Sleeve

The price of the Sleeve cover on the market is not expensive, but some friends want to make a Sleeve sleeve at home.Making home cuffs at home is generally restructured in old clothes, or cutting with excess cloth. The size of the Sleeve is mainly based on the thickness of your arm. Generally, the width of the fabric is less than 6 inches.Width, 1.3 feet long, enough to make a Sleeve.The practice of the Sleeve is:

1. Select ingredients: Choose the fabric or old clothes that are not needed at home, and put it on the table to cut.

2. Cutting: Fold the cloth into four layers, facing the opposite side, measure the opening from the opposite place to the opening, the upper cuffs are 0.63 feet, and the lower cuffs are 0.53 feet.The connection is connected, the shape of the ladder, and the excess part of the line is cut off.

3. Switching: The opening should be sutured. Generally, the rubber band is stitched with a rubber band. The loose Belt is sew first into small circles. The upper cuffs are larger and the lower cuffs are smaller.You can just relax.

4. Complete: After the suture is sutured, put on the arm to try it. If you have any problems, it can be used without any problems.

2. How to make DIY homemade sunscreen cuffs

The above introduces the cuffs of housework. Below teach you how to make sunscreen sleeves, you can make socks. The ice silk material is better. The specific method is:

1. Choose socks with good socks and cut the mouth of the socks; then choose a slightly thicker pantyhose, it is best to cut it.

2. The sock mouth and the cut pants legs are placed on a suitable foam or bottle. This is convenient for the sewing, because it is not convenient to set it in the hand.

3. After sewing the socks and pants legs, wear it on your hand to act as a sunscreen Sleeve. Put sunscreen on the arm, or you can wear it on the leg to keep warm, which is very practical.

1. How to hook a good -looking mobile phone bag

Material:scissors, hook needles, color matching wool, glue.

practice:

1. First of all, we have 15 needle lock needles.

2. Then hook a circle around this 15 -pin lock needle.The total number of needles is 32 stitches.

3. Then hook a needle 15 short needles, 1 short needle and 15 short needles, and the total number of needles is 34 needles.

4. Then 34 short needles are hooked in each lap, and the size of the mobile phone is ended.

5. Then we hook four small flowers, rose to 5 needles, and stood up 3 braid needles in one pinhole. Two long needles were pulled in the next pinhole, and the cycle ended 5 times.

6. Make two pink balls around your fingers.

7. Next, stick the decoration with glue on the mobile phone.A beautiful mobile phone bag is ready.

2. How to carry the mobile phone package beautifully

1. In front of the waist, the back of the mobile phone bag in front of the waist is the most basic back method. This kind of back method should pay attention to the consistency of the color of the mobile phone bag and the color of the clothes, so that the Bags and clothes are more coordinated.

2. On the side of the waist, the back of the mobile phone is more comfortable and more casual. The mobile phone bag is not the focus within the range of sight, but it is more free and free, and more individual.

3. Cross the chest, cross the mobile phone to cross the chest, look younger, energetic, and full of youthful atmosphere, especially the novel mobile phone bag crossing on the chest, which sets off the handsome and fashionable people.

4. Cross -body behind, the mobile phone bag crossing behind the back, when you walk through from others, the small and beautiful back on the backcell phoneThe bag will add a glory to your back.

1. Movement of mobile phone pockets

Material: Printing canvas.

step:

1. First, measure the size of your mobile phone case, and then add a little relaxation to the size of the bag.

2. According to the drawings and patterns, draw outlines on the opposite side of the canvas, plus sewing, cutting.(Note: If there is no special label, the drawings and paper samples are not sewing.)

3. Use a strap as a tablet, without a belly as a library.

4. The front and the tablet are opposed to each other, and they are aligned around. Draw a rectangular and pressure lines of 1*20 in the middle position.

5. Cut the rectangular inner and turn the library to the under the table.

6. The ironing is flat, prepare the zipper of the zipper head, and place the zipper under the rectangle (the side of the library).

7. Turn to the opposite side, fold a sewing inward at both ends of Libu and press the line with the table.

8. The surrounding code of the watches coincides with, and then the surface is inside, the library is outside, and the zipper is folded and sutured.

9. Do not sew too long at both ends here, otherwise it is difficult to turn out.

10. Turn to the front, turn out the band, iron the band inward, and then fold it, press the line on the front, and press to both sides of the bag.

11. Finally, install two types of words, and the mobile phone pocket is completed.

two,How to make jeans pocket

step:

1. Cut off the trousers and legs. Everyone has different jeans and does not write the size.

2. It's not a straight pants to repair one side, neat.

3. Prepare a piece of Libu of the same size.

4. Switch on the surface of the table.

5. Add a small lid.

6. Try the two ends of the zipper.

7. Swallow the zipper, the zipper sew in the middle of the table and the library.

8. Treat both ends for folding.

9. The two ends are the same.

10. Prepare two pieces of trapezoidal cloth, with a total of four slices at both ends.

11. The front is relative to suture two edges.

12. Turn to the front.

13. Put the side of the bag into the long side of the trapezoidal. The denim cloth itself is very thick, and the folds are added to become ultra -extremely thick. For the sake of strength, for the beauty, the cross joints are used.

14. Both sides are the same.

15. Cut another pair of pants legs decisively and make a Belt.

16. What else do you have to do, take your imagination yourself.

17. Cost with great achievements, take it to travel.