Sys_Dawson's Articles

1. What does a lounge chair mean?

The lounge chair fingers are one of the furniture with new styles and functional purposes that appear in the Qing Dynasty.There are many other nicknames in the lounge chair. "Before bed chair", "warm chair", "Xiaoyao chair", "spring chair" and "concubine chair", etc., are different titles for a certain type of lounge chair.The end -of -term craftsmanship and skills of the feudal society in my country have continued to improve, people pay more and more attention to the quality of life, the classification of living utensils is becoming more and more thinner, and furniture also produces some new varieties like lounge chairs.

2. What are the use of lounge chairs

The lounge chair fuses the dual advantages of beds and chairs. It is more relaxed than traditional chairs, and it is more convenient to carry than beds. Let us be relaxed and resting the whole body even in the external environment.Because lounge chairs can relax more than traditional chairs, they are relaxed and resting in a half -sleeping state.Therefore, it is widely used in the Hospital's escort chair, noon break chair, Outdoor Leisure chair, etc.The folding lounge chair is more convenient because of its convenience and practicality, flexible folding, small space, and easy to carry.During some emergency natural disasters, lounge chairs also have irreplaceable quickly resettlement of victims.

1. How to use the Bicycle code watch

The working principle of the bicycle sheet is that the sensor captures the information brought by the inductive magnet when the car rotation is rotated. The sensor code is transmitted to the code watch.

Function display

1. Automatically display.Press the function button (the big button below the code watch), and only the word AUTO appears. At this time, the code watch automatically displays the riding distance, time, total mileage and clock with a interval of 1 second.

2. Manually display.Press the function button, the word KM appears, indicating that the travel distance is displayed at this time;

Press the function button to appear alarm clock pattern, indicating that the travel time is displayed at this time, and the accurate display of the second;

Press the function button, and the word appears, indicating that the cumulative cycling distance that starts with the code watch at this time is displayed.

3. The code watch is clear.Pressing the function button is not less than 3 seconds. At this time, the numbers on the code flickering are flickering. Continue to hold it until the clear is cleared. The clear zero does not affect the cumulative riding distance.

Use setting

This function determines the correct use of the code watch, which is very important.The main function is to enter the car wheels, adjust the clock, change the speed unit, and turn on the automatic display function.

Enter the setting interface.Press the setting button on the back of the code watch for 3 seconds, and set the word, that is, enter the settings interface. At this time, the four -digit number displayed below is the wheel length. At this time, press the function button to enter the next function settings interface.

Exit the setting interface.Press the settings key for 3 seconds to return to the use state.

2. How to install the Bicycle code watch

1. Install the base of the code watch.

First install the base of the code watch. The back of the base has foam glue. Tore off the yellow plastic surface, you can stick it on the handlebar, and then use a rubber band to walk around a circle, stuck in the card slot on both sides of the base.The bottom of the code is firmly fixed on the handlebar.

2. Next installation header.

The inductive line is wrapped around the brake wire, until you need to install the position of the sensor, the sensor can be installed in the middle of the axle and the brake in the front of the front rod.

The installation method is similar to the installation base. After selecting the position of the sensor, press it with your fingers, and then use a large rubber band to circulate around the car, and buckle the rubber band into the card slot of the sensor.

3. Instant induction magnets.

The induction magnet needs to be installed on the steel wire banner of the tire, which can be facing the position of the sensor.After the soft magnet is put on the steel wire, the iron rings in the installation bag are stuck from the bottom to the groove of the magnet from the bottom to the groove.This is the best induction effect.

After this code is installed, the next time the wheels are adjusted, so the data read is accurate.

4. Setting perimeter parameters of bicycle codes

How to set the wheel diameter of the bicycle codes?Put the code watch with an angle of 45 degrees on the base, press it slightly, and rotate it counterclockwise.Then look for a straight line on the road. Generally there are cement floor. People ride on the car and adjust the nearest position of the valve core of the tire to keep the nearest position on the ground.The distance between the measurement is the perimeter of the wheel, so the measurement is more accurate than the reference value of the tire on the instruction manual, because when the person is riding on it, the tire pressure will change.The value is fine.Specific settings can be adjusted to the WHEEL SIZE menu and fill in the preset value.

Kind tips:The setting of the Bicycle code watch needs to be set according to the purchased code table brand, as well as models (such as mountain vehicles, road cars, and station wagons). Different brands have different models with different code table settings.Different brands and different installation details. Different models generally need to understand when debugging the code table data.Therefore, carefully read the manual before installing the bicycle codes.

1. Do you have to use two Hiking sticks?

The Mountaineering stick is used by a single stick or a double stick. In fact, it is according to personal needs, but the most important thing is to know how to use it.

Most people will not be carrying things outdoors outdoors, so they feel that they can be taken. Two uses together are the standard. It is the most authentic approach.If you are, your body is easy to side.Using a pair of mountaineering sticks can reduce the weight of the feet, but at the first use, the Climbing stick will easily trip the block and practice more.

And not every terrain is suitable for using mountaineering sticks. Walking less in the ravine with mountaineering sticks, preferring to balance your hands, because the environment of the ravine is relatively complicated, many large stones are used in a flat ratio.The gap is large and may jump.Except for the ravine and the terrain that needs to be climbed, other roads can be used.

2. One or one pair of mountaineering sticks

Do you want to buy a pair of mountaineering sticks?It is best to buy two mountaineering sticks, which is more conducive to maintaining a balance.If you only use one Mountaineering stick, the two legs are different, and it is easy to cause knee damage over time.

After studying the mountaineering rods in the sports science community, it was found that when using two climbing sticks at the same time, it can reduce the impact of 22%of the knee joint. This is equivalent to one kilometer one kilometer, and your knee joint avoids the impact of 5500 ~ 5800kgWForce, the muscle group in the legs can also be reduced by 21 %.

Studies are usually based on a pair of mountaineering sticks as the experimental benchmark. Only one can achieve the same effect without data comparison, but we believe that in terms of use efficiency and force balance, the effect of using two mountaineering sticks will be used only one by only one of only one of only one of only one of one one.Gendo mountain rods are easier to maintain balance and coordination, especially when the load is more than 12 kg or the Hiking time is long and the mountain trail is rugged.

However, some mountain roads are on the edge of the cliff, so it is recommended to put away one Climbing stick as depending on the situation, and the other hand can grasp the solid tree roots and rocks to assist the balance of uphill.There are also many terrain that needs to be used to climb, and sometimes you need to put away both of both mountain climbing sticks.

1. What are the actions to increase yoga?

1. Lie on your legs

Lie on your back, straighten your legs, open your arms to both sides, raise your fingers at the same time, open your fingers, slowly lift your left foot to leave the ground, and kick out the back, maintain it for 30 seconds, and replace it on the other side to repeat.

2. Turn on your back

Lie on your back, straighten your legs, hold your hands on the back of your head, stretch your right leg straight on the bed, twist your body to the right, and bend your left leg with 90 degrees, so that the left leg is placed on the right side of the right leg, replaced to the right side of the right leg, and replaced to the right side of the right leg.Repeat the other side.
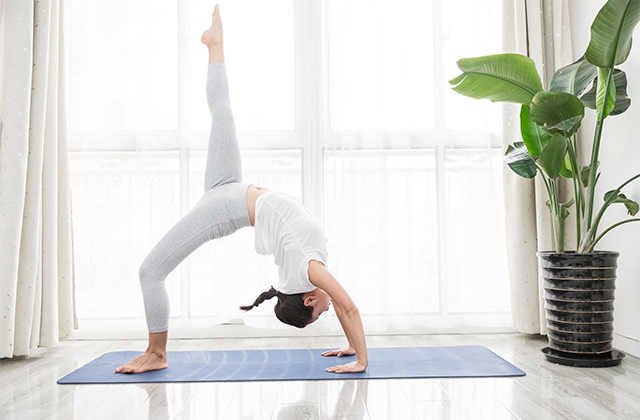
3. Bridge

(1) Lie on the back, the back of the back, straighten your arms and close your body, bend your knees, your feet are completely on the ground, and your abdomen will breathe.

(2) Slowly support your arms, lift your hips and leave the ground at the same time, and raise your thigh surface with a straight line with the side of the body.

4. Stretch your legs

Lie on your back, the back of the back, straighten your arms and close the floor, bend your left knee, your left foot is completely on the ground, straighten your right leg, keep the two legs on a horizontal plane, extend your right foot as much as possible, and maintain 30 seconds.Replace it on the other side to do it repeatedly.

5, limbs towards the sky posture

Lie on your back, be on the back of the ground, straighten your arms straight up, and keep the shoulders wide, the palms are opposed, your feet are close together, and at the same time, straighten your legs and lift it away from the floor, until the arms are parallel to the legs, the head is slightly leaning, and the head is slightly tilted.30 seconds, replace it on the other side and repeat it.

6. Shoulder down

Lie on your back, be on the ground, place your arms on both sides of the body, slowly lift your feet and leave the ground, and lift your hands upwards, drag your hands behind your waist, and support your waist and stay away from the bed.The posture in the picture.

2. Is yoga increase really useful?

Although heighting yoga is an effective increase in exercise, different human constitutions are different, and the Bone development of the body is different. Therefore, the effect may be different after practice.Some people have started practicing before their Bone development is not mature, and after practicing, they have seen results.However, some people have matured skeletal development, and it has reached the level of difficulty changing. Continuous practice may not be effective.

How long does it take to increase yoga to increase? This depends on personal circumstances.Some people have found that they grow taller for 3 months, but some people may not have grown tall for a year.But it is certain that the time to increase the height yoga is too short, such as one month, it cannot be achieved.Because no matter what kind of movement, short -term exercises can not achieve results, and long -term persistence is needed to change the bones.In addition, during the practice period, you must also cooperate with diet therapy to eat more foods that promote Bone development or drink more nutritious soup, such as Bone soup.If the nutrition is made up, the yoga movement is also well done, and naturally it will have an increased effect.

Third, practice the precautions for increasing yoga

1. When practicing yoga, you must practice action within your own limit edge range. Do not force yourself, or you may strain.The so -called limited range is when you stretch until you can't stand it. If you feel pain, don't continue to move.

2. At the beginning, the high yoga may occur. After practicing, muscle soreness may occur, but do not be too nervous. This is a normal reaction. As long as you massage and ice appropriately, you can relieve it.

3. Practicing yoga, it is best to practice in an empty stomach.Generally, one hour before practice is unable to eat, but if you eat, take a little rest for a while, and then do it. Otherwise, the movement involves abdominal related actions, which will affect digestion.

4. During the practice, if there are no special requirements, you usually breathe with your nose.But if you have mastered the yoga breathing method, you can exercise flexibly, and you can also use it cleverly.

5. yoga movements are slow and clear. If you find that the movement is rapid and short during practice, it may be to learn wrong. You must stop immediately and practice the correct movements.

Disclaimer: The above method stems from the index of the program system or the sharing of netizens. It is for your reference only and does not represent the research perspective of this website. It proves that it is valid. Please pay attention to the authenticity and authority of the source of the content of the content.Apply to delete & gt; & gt; error correction & gt; & gt;

1. How to store camping equipment

Camping is a kind of outdoor activities that are suitable for all ages. Many people like this activity. If you participate in Camping, you must first prepare camping equipment, but there are many camping equipment, especially "moving Camping".A major problem, so how to store camping equipment?

1. Edit list of camping equipment

Before each Camping, we must clarify a list of camping equipment. After all, each Camping location and goals are different. If you find that you do nt bring a camping equipment, it will be troublesome. In fact, the equipment list has another role.For the use of statistical equipment after each Camping, if you find that you bring excess equipment every time, you can remove it next time.

2. camping equipment classification and storage

If the camping equipment is not classified, it will be chaotic, especially when there is a lack of light sources. In the face of emergency situations, you can't find the required equipment.The principle of urgency and miscellaneous classification is classified and placed in the neighboring position when storing.

3. Remember the principle of light and lightness

Many people think that the Camping Backpack must focus on the bottom layer and make the Backpack stand stable. In fact, this concept is very wrong.From the perspective of the structure of the human body, the shoulder can be used to bear weight. If the weight is on the bottom layer of the Backpack, the gravity will pull the person behind; on the contrary, when the weight is on the upper layer of the Backpack, the weight will be pressed on the shoulder of the person, and at the same time, it will be more.Keep close to the back and avoid the trouble of constantly shifting backpacks during long travel.

4. Non -emergency supplies first place

The bottom of the Backpack, sleeping seats, Sleeping bags, warm clothing, etc. are not commonly used; then spread tents, sky curtains, etc., dont worry about it. Most of the current Camping backpacks are set up below.Emergency situations can be taken out of the bottom equipment.

5. Food should be placed on the surface layer.

Unless you can process food such as canned food, the Picnic session is always a great fun of Camping. However, when you go to the wild, it is more difficult to keep fresh ingredients.The ingredients are pressed, and the time to accelerates bad.At the same time, you can also put a survival blanket to clean up the Backpack on the top of the inner layer to strengthen the outer layer to protect the ingredients. The appearance of the Backpack will be more flat and beautiful.

6. Simple peripherals to avoid hooking foreign objects

The outer layer of the Camping Backpack is generally as small as possible, and even the water bottle is not recommended to put it, so as not to hook the plants and stones between the mountains and forests.It is recommended to put the mountain climbing stick on both sides of the Backpack to cope with the far path.

2. What tools do we use for storage and camping equipment

The storage of camping equipment is generally placed in the Camping Backpack. In addition to Camping backpacks, there are many storage artifacts to help storage camping equipment, such as::

1. Box kitchen

Not only is there a whole set of kitchen in the box, it can become a dining table in a few seconds. A box is all storage boxes, stove heads, tables, kitchenware.

2. Box tea room

The tea table is a storage box. Tea tables, tea sets, tea stoves, and teapots are all available. They do not waste a little space and are suitable for camp friends who like to drink tea.

3. Aluminum alloy box

This is a box that can support the atmosphere, and it is also the most suitable equipment for storing the atmosphere: lamps, coffee machines, exquisite cups, tableware, etc. The box can be used as an atmosphere ornament. It is also a very good operating table.

4. folding box

It is also a good thing for the atmosphere. Exquisite Camping is commonly used in storage boxes. It is mainly used for storing hard objects. It can be used with table boards. It can also be used as a table. If it is not used, you can fold it and leave a redundant space for the trunk.

5. Small Tool box

It is specially used to store small and fragmented things, such as rotating joints, extension lines, ignition, spray guns, etc., which is also very suitable for putting some needle wires and other items.

6. Insulation box

It can be used to store ingredients, vegetables, drinks and beverages that need to be cold and fresh. If possible, you can buy a foldable Insulation box.

7, tableware storage bag

It is used to store tableware such as chopsticks, spoons, knives, forks.

8. shoes and Bags

It is also very convenient to use shoe Bags to store clothes such as shirts.

9. Transparent storage package

There are transparent windows, easy to use, and are generally used to storage toiletries, makeup supplies or digital supplies.

10. Camping accessories package

Used for storage accessoriescamping equipment, such as ground nails, wind ropes, etc., although these can be placed with tents, it is recommended not to put it like this. One is to avoid breaking the Tent, and the other is to prevent it from being messy.